7 Easy Steps to Make a Crochet Hat for Big Hair
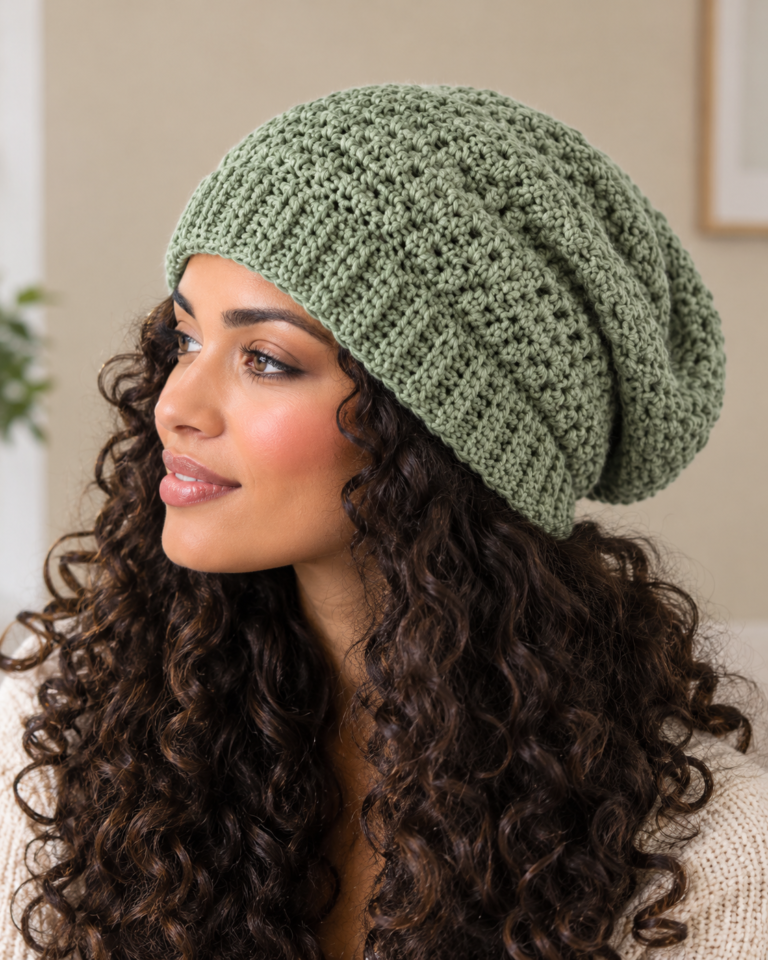
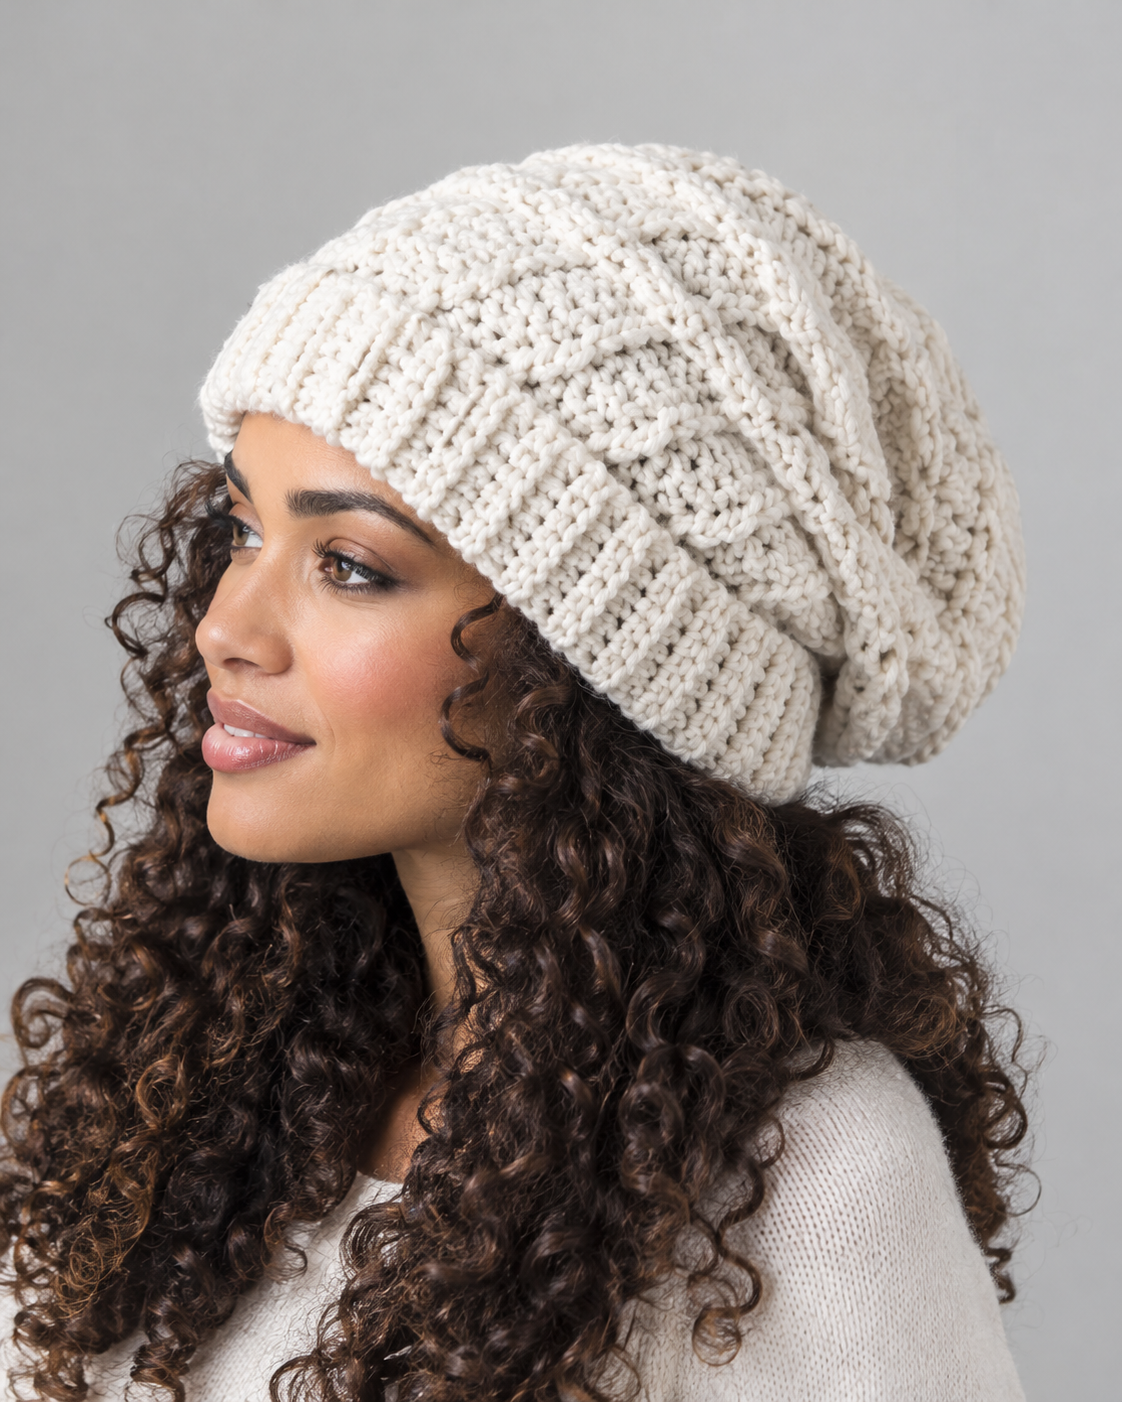
Looking for a crochet hat for big hair that feels comfortable without flattening your curls? This roomy crochet beanie is designed with extra space for thick, curly, natural, or voluminous hair.
Unlike a traditional fitted beanie, this crochet hat for big hair uses a simple rectangular panel that is folded, seamed, and gathered at the crown. This construction makes it easier to adjust the hat’s height and circumference without complicated crown decreases.
This written crochet pattern includes a size guide, yarn and hook recommendations, stitch instructions, and practical tips for customizing your fit
Why This Crochet Hat Works for Big Hair
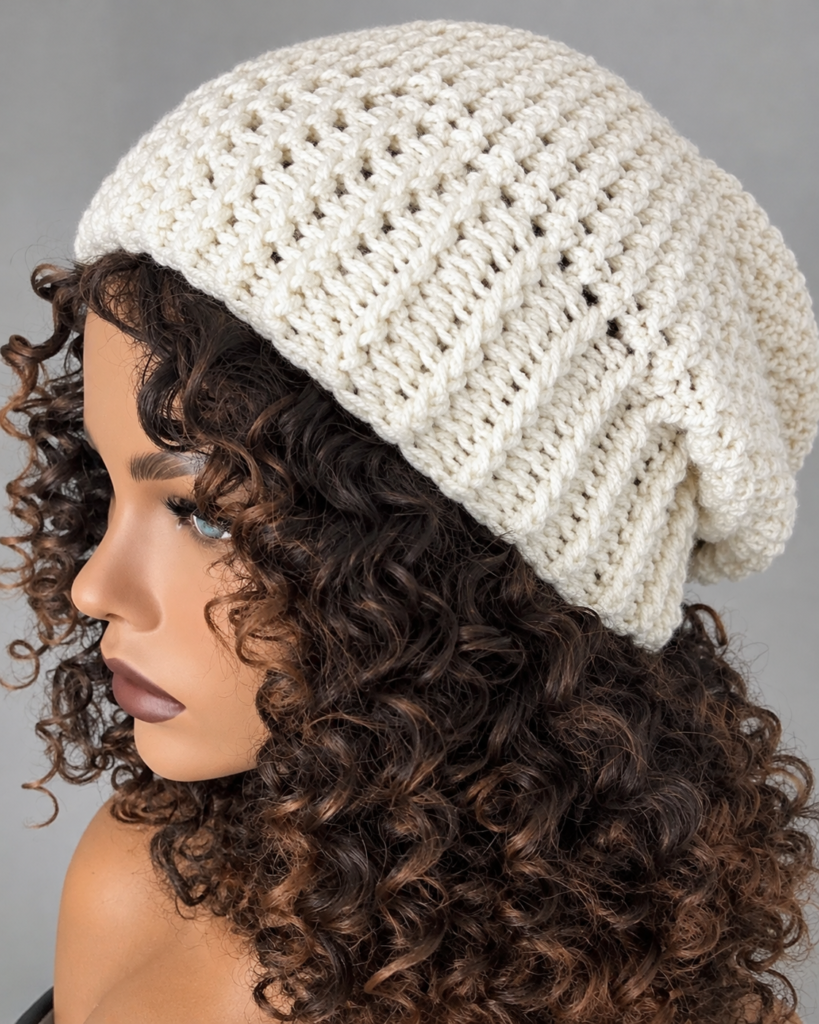
A comfortable hat should fit around your head and your hairstyle, not just your head circumference. Measuring over your usual hairstyle helps you choose a size that leaves enough room for your hair.
This design offers several useful features:
- Extra room: Choose a circumference based on your measurements over your hair.
- Adjustable height: Make a shorter beanie or a roomier slouchy hat.
- Simple construction: Crochet a rectangle instead of working complicated shaping rounds.
- Flexible styling: Fold the bottom edge into a brim or leave it unfolded.
- Customizable fit: Adjust the number of rows to change the circumference.
The finished fabric should feel comfortable rather than tight. Your choice of yarn, hook, and stitch tension will affect how much stretch the hat has.
Materials and Tools
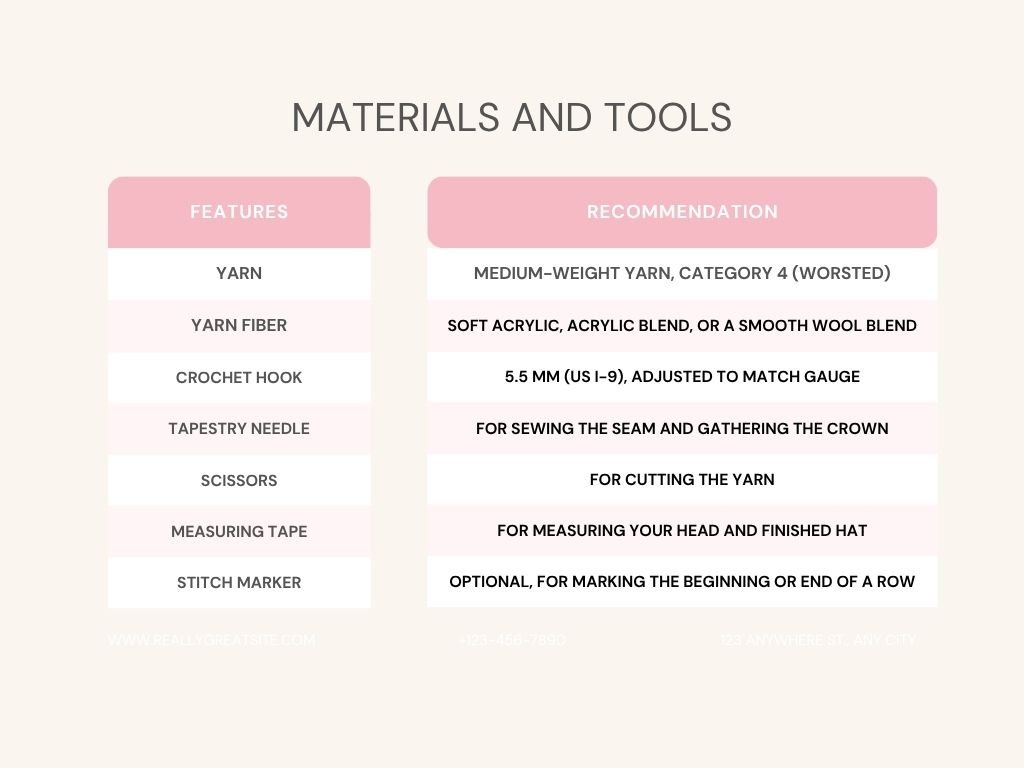
Gather the following supplies before starting.
How much yarn will you need?
For planning purposes, allow approximately 220–350 yards (201–320 meters) for an adult hat, depending on the finished size, height, stitch tension, and yarn. This is an estimate, not a tested yardage measurement. Weighing a finished sample is the best way to refine the estimate.
Medium-weight yarn is a useful starting point because it provides warmth without necessarily creating an overly stiff fabric. Check the yarn label and make a gauge swatch before beginning. The Craft Yarn Council provides standard yarn-weight categories and recommended hook ranges as general guidance. See the yarn-weight standards.
Crochet Hat Size Chart for Big Hair
Measure around your head over your hair in the style you expect to wear under the hat. Keep the tape comfortably snug without compressing your hair.
The following are suggested starting sizes for this roomy design, not standardized age-based measurements.
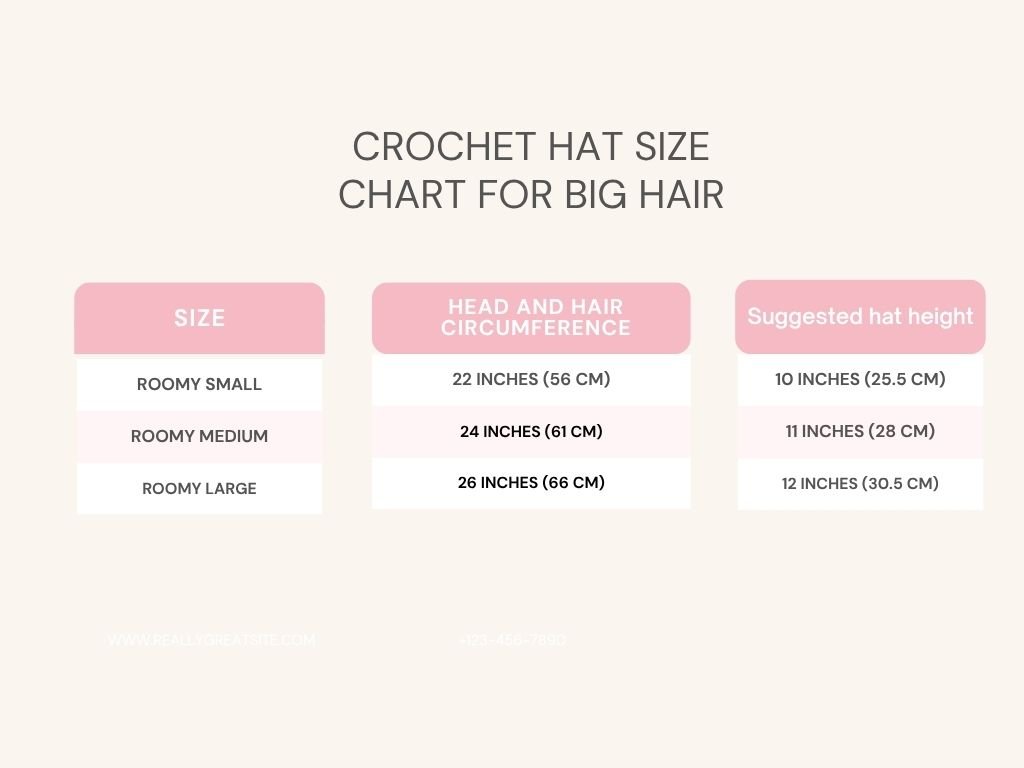
Choose the size closest to your measurement, then adjust the circumference or height to suit your hairstyle.
If you prefer a more fitted hat, you may want a slightly smaller finished circumference. For a relaxed fit over voluminous curls, start with a finished circumference close to your measured head-and-hair circumference. The fabric’s stretch will influence the final fit.
How to Measure for a Comfortable Fit
- Put your hair in the style you normally wear with a hat.
- Wrap a measuring tape around the widest part of your head and hairstyle.
- Record the circumference without pulling the tape tightly.
- Measure from the crown of your head to the point where you want the hat to end.
- Add extra height if you want a slouchy shape or a folded brim.
Gauge and Stitch Abbreviations
Checking your gauge helps you make a hat that matches your intended measurements.
Suggested starting gauge: 12 half double crochet stitches and 10 rows = 4 inches (10 cm), using the recommended yarn and hook.
This is a target gauge for the proposed design, not a verified swatch result. Crochet a sample and adjust your hook if necessary.
US Crochet Abbreviations
- ch: chain
- hdc: half double crochet
- BLO: back loop only
- st/sts: stitch/stitches
- sl st: slip stitch
- FO: fasten off
How to Make a Half Double Crochet
- Yarn over and insert your hook into the designated stitch.
- Yarn over again and pull up a loop. You should have three loops on your hook.
- Yarn over once more and pull through all three loops.
What Does Back Loop Only Mean?
Each stitch has two loops at the top. The front loop is closest to you, and the back loop is farther away.
For a back-loop-only half double crochet, insert your hook under the back loop only. This creates a ridged, flexible fabric that works well for a casual beanie.
Easy Crochet Hat for Big Hair: Written Pattern
This proposed pattern uses a rectangular panel worked in rows. The shorter edge determines the hat’s height, while the number of rows determines its circumference.
Construction overview:
- Crochet a rectangle to the desired height and circumference.
- Join the short edges to form a tube.
- Gather one end to close the crown.
- Finish the lower edge with an optional folded brim.
Step 1: Make a Gauge Swatch
Using your selected yarn and hook, crochet a small sample in half double crochet.
Measure a 4-inch (10 cm) section and count the stitches and rows. If your sample differs from the suggested gauge, change your hook size and try again.
A larger hook generally produces larger stitches, while a smaller hook generally produces smaller stitches. Always measure the swatch rather than relying on hook size alone. Learn more about checking crochet gauge.
Step 2: Crochet the Rectangular Panel
Make a foundation chain long enough to produce the height selected in the size chart. As a starting point, a gauge of approximately 12 stitches per 4 inches may require around 30–36 chain spaces for a panel measuring roughly 10–12 inches wide, depending on the turning chain and your tension.
Row 1: Half double crochet across the foundation chain, beginning in the appropriate chain for your turning-chain method.
Row 2: Chain 1 and turn. Work one half double crochet in the back loop only of each stitch across.
Rows 3 onward: Repeat Row 2 until the panel reaches the desired circumference when measured along the row direction.
Keep the same stitch count throughout the panel. Measure the work periodically instead of relying only on the number of rows.
Important: The chain count is only a starting estimate. The actual number of stitches and rows needed must be determined from your gauge swatch and the finished measurements you want.
Step 3: Join the Side Seam
Fold the rectangle so its short edges meet, with the wrong side facing outward.
Join the short edges using slip stitches or a tapestry needle and a mattress stitch. Keep the seam even and avoid pulling it too tightly.
You should now have a tube with an open top and bottom.
Step 4: Gather the Crown
Cut a long yarn tail and thread it through a tapestry needle.
Working around one open edge, pass the yarn through the ends of the rows. Pull the yarn gently to gather the fabric toward the center.
Continue adjusting the gathers until the opening closes. Secure the yarn firmly on the inside, then weave in the remaining end.
Check that the gathered crown is secure and that the fabric is not bunched excessively on one side.
Step 5: Finish the Lower Edge
Try the hat on before finishing the lower edge.
For a simple look, leave the bottom edge as it is. For a folded brim, turn the lower edge upward to your preferred depth.
If you want a more defined brim, work a few additional rows in a ribbed stitch pattern before joining the panel. Keep in mind that adding a thick or tight brim may reduce the space available for your hair.
Weave in all remaining ends and gently shape the hat.
How to Customize the Fit
If Your Hair Is Very Voluminous
Measure over your hair in its usual style and choose a circumference that accommodates that measurement. If the hat compresses your curls, increase the target circumference or choose a more flexible stitch pattern.
If You Want a Slouchy Beanie
Increase the panel height rather than the circumference. Extra height creates more fabric that can fall toward the back of the head.
If the Hat Feels Too Tight
Check whether your gauge is smaller than intended. You may need a larger hook, a looser stitch tension, or a larger circumference.
If the Hat Feels Too Loose
Check the finished circumference and the stretch of the fabric. A smaller hook may create a firmer fabric, but changing the hook also changes the gauge, so remeasure before continuing.
Common Mistakes to Avoid
Ignoring the gauge: A small difference in stitch size can change the fit. Measure your swatch before calculating the panel dimensions.
Measuring only your head: If you wear your hair in a puff, bun, or voluminous curls, measure over that hairstyle.
Pulling the crown too tightly: Gather the opening evenly and secure it without creating an uncomfortable knot or a bulky lump.
Making the brim too narrow: A narrow brim may roll or fail to sit comfortably. Test the folded depth before sewing or finishing it permanently.
Assuming every yarn behaves the same: Different fibers and yarn constructions stretch and drape differently. Check the finished fabric before committing to the full project.
Frequently Asked Questions
What is the best yarn for a crochet hat for big hair?
A soft medium-weight acrylic or acrylic blend is a practical starting point. Look for a yarn that feels comfortable against the skin and creates a fabric with enough flexibility for your intended fit.
What crochet hook size should I use?
Start with a 5.5 mm (US I-9) hook for medium-weight yarn, then adjust it according to your gauge swatch. The recommended hook on the yarn label is a useful starting point, not a guarantee of the finished size.
Can I make this hat for very thick or natural hair?
Yes. Measure over the hairstyle you intend to wear under the hat and customize the panel dimensions accordingly. For a high puff or large bun, you may need additional height or a different construction that leaves enough room for your hairstyle.
Can I make the hat less slouchy?
Yes. Reduce the height of the rectangular panel while keeping the circumference appropriate for your head and hair.
Do I need to decrease stitches at the crown?
No complicated decrease rounds are needed for this rectangular construction. The top is gathered with a yarn tail. The gathered finish will look different from a traditionally shaped crown.
How do I know whether the hat will fit before finishing it?
Measure the panel as you work and compare it with your target dimensions. Because yarn and stitch tension affect the final result, try the tube on carefully before closing the crown and finishing the brim.
Final Thoughts
A crochet hat for big hair should provide comfort, enough room for your hairstyle, and a fit that suits the way you want to wear it. This rectangular construction is a useful starting point because it allows you to adjust the height and circumference independently.
For the best result, measure over your hair, check your gauge, and test the fit before completing the crown. Add original process photos showing the rectangular panel, side seam, gathered crown, and finished beanie to help readers follow each stage with confidence.